Configuring an Android Spinner control to use an array of java objects
Written by Bill Johnson - October 29th, 2010
Written by Bill Johnson - October 29th, 2010
If you enjoy this tutorial, please consider supporting the author by purchasing the "Halloween Eyes" live wallpaper from the android market. It's priced at only $0.99 and it takes a lot of sales to amount to much. Thank you for your support.
I spent a few hours searching the internet, looking for anybody, anywhere who could show me how to simply define an array of java objects, configure an Android Spinner to display this list, and then somehow determine which Object in the list had been selected. This search proved to be fruitless as I found numerous examples of populating this list with an array of Strings or via an XML resource, but absolutely NO examples of how to do what I was looking to do. I was simply amazed and I told my self that it couldn't really be that difficult....and I was correct.
In this article I will show you exactly how to do this and you'll end up being surprised at just how simple it is. You may download the example project code from here, although I'd encourage you to go through the effort of typing it in as it is my belief that this reinforces the material and facilitates learning and retention.
If you are creating this project from scratch, simply create a new android project. Nothing during the setup is relevant to what we will be doing, so you can choose any names and packages that you want. I named my main activity MainScreen and I picked android 2.1.
Open up your main.xml layout and add a Spinner control to the layout. I also added a button so that I can demonstrate some other functionality, but that's really extra and not necessary. My XML ends up looking like this:
main.xml
<?xml version="1.0" encoding="utf-8"?>
<LinearLayout xmlns:android="http://schemas.android.com/apk/res/android"
    android:orientation="vertical"
    android:layout_width="fill_parent"
    android:layout_height="fill_parent"
    >
<TextView
    android:layout_width="fill_parent"
    android:layout_height="wrap_content"
    android:text=""
    android:id="@+id/results"
    />

<Spinner android:id="@+id/Spinner01" android:layout_width="wrap_content" android:layout_height="wrap_content"></Spinner>
<Button android:text="@string/buttonname" android:id="@+id/Button01" android:layout_width="wrap_content"
           android:layout_height="wrap_content"></Button>

</LinearLayout>
Now for this example I decided to use a simple list of 4 states and want to track the state name, abbreviation, and a numeric id.
Here is the data that I wish to manage:
| Id | Name | Abbreviation |
| 1 | Minnesota | MN |
| 99 | Wisconsin | WI |
| 53 | Utah | UT |
| 153 | Texas | TX |
Now, let's wire this thing up to use that data. For this example I wanted to assume that this data not coming back from a database because there are specific adapters for those cases. Suppose that this data was coming back from a JSON call and that you need to parse and manage it within this application. This is precisely the approach that I took while writing an android game collection that had spinners that were dynamically populated as the result of JSON web service calls. There are three basic parts to wiring up this data:
- Create a class to hold the data, I called mine State
- Configure a ArrayAdapter to hold this data
- Tell the Spinner control about the data
Here is the code for the State class. Notice that it really isn't much more than a data container.
State.java
package com.katr.spinnerdemo;

/*
 * 10/29/2010
 * Author: Bill Johnson - KATR Software Incorporated
 * Original Tutorial URL: http://www.katr.com/article_spinner01.php
 * http://www.katr.com
 *
 * If you like this example, please support the author by purchasing the "Halloween Eyes" live
 * wallpaper from the android market.  C'mon, it's only $0.99.
 *
 */
public class State {
	// Okay, full acknowledgment that public members are not a good idea, however
	// this is a Spinner demo not an exercise in java best practices.
	public int id = 0;
	public String name = "";
	public String abbrev = "";

	// A simple constructor for populating our member variables for this tutorial.
	public State( int _id, String _name, String _abbrev )
	{
		id = _id;
		name = _name;
		abbrev = _abbrev;
	}

	// The toString method is extremely important to making this class work with a Spinner
	// (or ListView) object because this is the method called when it is trying to represent
	// this object within the control.  If you do not have a toString() method, you WILL
	// get an exception.
	public String toString()
	{
		return( name + " (" + abbrev + ")" );
	}
}
This is nothing more than a simple container class that can hold values of your choice. There is an important aspect to this class, however. Notice the toString() method. This simple routine is the key to making this class work with the Spinner control. What happens is that the spinner has a "data object" that it really knows nothing about, but just calls the toString() method and displays the result of that method in the spinner. If you don't define this method, your application will fail with an exception.
Now for the fun part, it's time to make this Spinner come alive with our data. First add a static member to the class to represent the Spinner.
static Spinner spinner = null;
Now add the following lines to the onCreate method in our activity java class, in this case it is MainScreen.java.
       // Step 1: Locate our spinner control and save it to the class for convenience
        //         You could get it every time, I'm just being lazy...   :-)
        spinner = (Spinner)this.findViewById(R.id.Spinner01);

        // Step 2: Create and fill an ArrayAdapter with a bunch of "State" objects
        ArrayAdapter spinnerArrayAdapter = new ArrayAdapter(this,
              android.R.layout.simple_spinner_item, new State[] {
        			new State( 1, "Minnesota", "MN" ),
        			new State( 99, "Wisconsin", "WI" ),
        			new State( 53, "Utah", "UT" ),
        			new State( 153, "Texas", "TX" )
        			});

        // Step 3: Tell the spinner about our adapter
        spinner.setAdapter(spinnerArrayAdapter);
Let's talk about each of the steps identified above.
Step 1 Get a reference to a Spinner control within your activity. This should be relatively self-explanatory, however all it is doing is gaining access for our code to manipulate the Spinner control that we placed in our main.xml file.
Step 2 This is where the magic happens and admittedly, it is a busy piece of code. Here's what's going on:
- Create an ArrayAdapter that can hold an array of State objects
- The android.R.layout.simple_spinner_item is simply a reference to a stock display layout for spinner controls
- Fill a State array that is used to populate the ArrayAdapter. Each new State(..) call is creating and populating a State object that is then placed in the array.
That's it for the setup. If you run your application, you should get something like the images below:
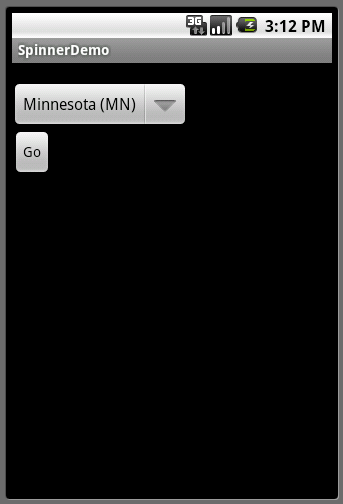 The Spinner |
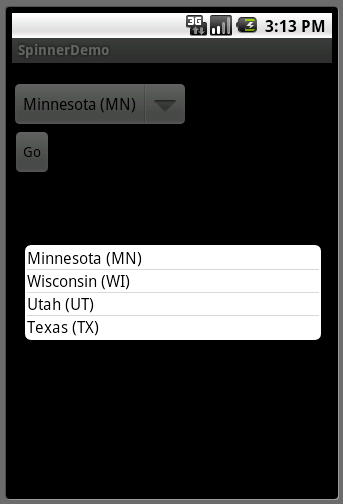 The list displayed when clicked |
Take a look back at the State.toString() method and you can see how we are appending the abberviation to the State name and that this is indeed displayed in the Spinner control and the list that is displayed when it is clicked upon. Now we'll go through an example of using the selected item in the list as a State class object, not as a String. The project contains two methods, however we'll only go through one here. We are going to define a method that will get fired when we change an item in the list (note that this event will also fire when the list is initially displayed, so make sure to keep that in mind). First change the activity class definition to include implements OnItemSelectedListener as follows:
public class MainScreen extends Activity implements OnItemSelectedListener {
Second, add the following line of code to the bottom of the onCreate method of the activity:
        // Tell the spinner what to do when an item is changed
        spinner.setOnItemSelectedListener(this);
Now add the following methods to the activity class:
    public void onItemSelected(AdapterView<?> parent, View view, int position, long id)
    {
    	// Get the currently selected State object from the spinner
    	State st = (State)spinner.getSelectedItem();

    	// Show it via a toast
    	toastState( "onItemSelected", st );
    }

    public void onNothingSelected(AdapterView<?> parent )
    {
    }

    public void toastState( String prefix, State st )
    {
    	if ( st != null )
    	{
    		String desc = "Event: " + prefix + "\nstate: " + st.name;
    		desc += "\nabbreviation: " + st.abbrev + "\nid: " + String.valueOf( st.id );
			Toast.makeText(getApplicationContext(), desc, Toast.LENGTH_SHORT).show();
    	}
    }
The first two are required for the onItemSelected interface. The third simply displays some feedback to the user in the form of a Toast so that you can actually see that the event has fired. Take a look at the onItemSelected method and notice that the selected item that gets retrieved is actually a State object. This is because the ArrayAdapter that we configured was populated with State objects. Now you can simply use this object as you would any other java class. You can do this anywhere in your application as long as you can get a handle to the Spinner object.
Here are some images of the program in action including the "Toasts" that get generated:
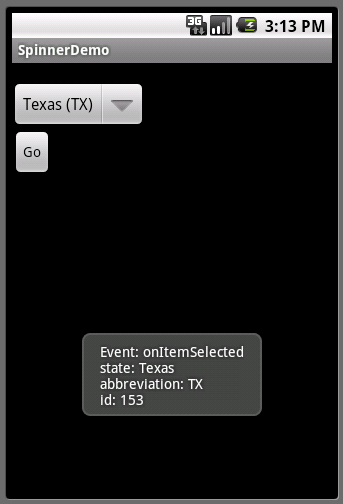 |
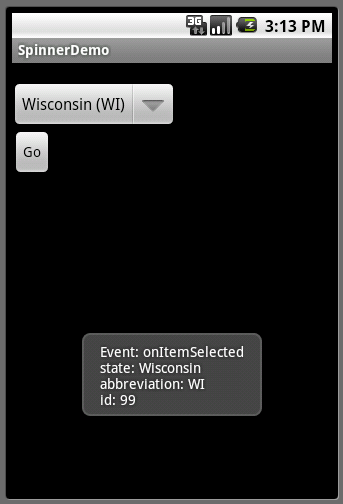 |
That's it....you've populated a Spinner with custom objects, watch them get displayed and selected, and then retrieved them in subsequent parts of the program. The rest is up to your imagination.
Download the complete project here.
If you enjoyed this tutorial, please consider supporting the author by purchasing the "Halloween Eyes" live wallpaper from the android market. It's priced at only $0.99 and it takes a lot of sales to amount to much. Thank you for your support.
Because I frustrated by piece-meal code just as much as the next person, I've included the full listing of MainActivity.java below:
main.xml
package com.katr.spinnerdemo;

/*
 * 10/29/2010
 * Author: Bill Johnson - KATR Software Incorporated
 * Original Tutorial URL: http://www.katr.com/article_spinner01.php
 * http://www.katr.com
 *
 * If you like this example, please support the author by purchasing the "Halloween Eyes" live
 * wallpaper from the android market.  C'mon, it's only $0.99.
 *
 */
import android.app.Activity;
import android.os.Bundle;
import android.view.View;
import android.view.View.OnClickListener;
import android.widget.AdapterView;
import android.widget.ArrayAdapter;
import android.widget.Spinner;
import android.widget.Toast;
import android.widget.AdapterView.OnItemClickListener;
import android.widget.AdapterView.OnItemSelectedListener;
import android.widget.*;


public class MainScreen extends Activity implements OnClickListener, OnItemSelectedListener {
    static Spinner spinner = null;

    @Override
    public void onCreate(Bundle savedInstanceState) {
        super.onCreate(savedInstanceState);
        setContentView(R.layout.main);

        // Step 1: Locate our spinner control and save it to the class for convenience
        //         You could get it every time, I'm just being lazy...   :-)
        spinner = (Spinner)this.findViewById(R.id.Spinner01);

        // Step 2: Create and fill an ArrayAdapter with a bunch of "State" objects
        ArrayAdapter spinnerArrayAdapter = new ArrayAdapter(this,
              android.R.layout.simple_spinner_item, new State[] {
        			new State( 1, "Minnesota", "MN" ),
        			new State( 99, "Wisconsin", "WI" ),
        			new State( 53, "Utah", "UT" ),
        			new State( 153, "Texas", "TX" )
        			});

        // Step 3: Tell the spinner about our adapter
        spinner.setAdapter(spinnerArrayAdapter);

        // Tell the spinner what to do when an item is changed
        spinner.setOnItemSelectedListener(this);

        // Find our button and hook-up the click routine
        Button button = (Button)this.findViewById(R.id.Button01);
        button.setOnClickListener(this);
    }

    public void toastState( String prefix, State st )
    {
    	if ( st != null )
    	{
    		String desc = "Event: " + prefix + "\nstate: " + st.name;
    		desc += "\nabbreviation: " + st.abbrev + "\nid: " + String.valueOf( st.id );
			Toast.makeText(getApplicationContext(), desc, Toast.LENGTH_SHORT).show();
    	}
    }

    public void onItemSelected(AdapterView<?> parent, View view, int position, long id)
    {
    	// Get the currently selected State object from the spinner
    	State st = (State)spinner.getSelectedItem();

    	// Show it via a toast
    	toastState( "onItemSelected", st );
    }

    public void onNothingSelected(AdapterView<?> parent )
    {
    }

    // This click routine is simply here to show you how to get the current spinner item outside of
    // a spinner generated event.  You'll notice that it is identical to the code use in the
    // onItemSelected event.
    public void onClick(View v )
    {
    	// Get the currently selected State object from the spinner
    	State st = (State)spinner.getSelectedItem();

    	// Show it via a toast
    	toastState( "onClick", st );
    }


}
This article was designed, produced, and written by Bill Johnson exclusively for KATR Inc.
and is copyrighted 2005-2008, KATR Inc., all rights reserved.

About the writer:Bill Johnson
Having worked as a computer consultant, independent contractor, and an IT employee,
Bill has developed a strong background in many areas, including information
systems technologies, systems administration, application development, web development
and deployment, game research and development, and graphics manipulation.  Bill
operates as a full-time computer consultant, while at the same time maintains numerous servers,
web sites, and office networks for a variety of clients, both professional and personal.  Having previously
served as an owner, partner, and director for a successful 80 employee computer consulting, he has unique insights
into the challenges of owning and operating a business with partners of diverse business backgrounds.

Bill graduated summa cum laude from Bemidji State University in 1989 with a bachelor's
degree in computer science.  He has earned his private pilots license with an instrument rating and is a
certified SCUBA diver.  As well as serving on the local Community Education Advisory
board, he also enjoys coaching his two boys in various athletic programs, karate,
hiking, camping, fishing, rock climbing, and hunting.
